|
|
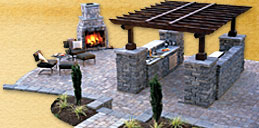
Do-It-Yourself 1" Brick Paver Installation Instructions
Tools Needed
- Flat Shovel
- Wheelbarrow
- String Line
- Wooden Stakes
- Spray Paint
- Garden Hose with Fine Spray Nozzle
- Push Broom
- Plate Compactor (rented) or Base Tamper
- Hard Garden Rake (or Base Rake)
- Masonry Saw (rented)
- Level at least 4 feet long
- Wood screed strip a 2 inches x 4 inches at least 3 feet long
- Trowel
Materials Needed
Brick pavers can be installed over existing concrete as long as it is in fairly good condition. Any large cracks, holes or dips should be rectified in order to achieve a flat surface.
Preparing the Surface Area
A half-inch setting bed of sand should be laid, levelled and compacted. You can use a hand held base compactor as you install the bricks.
An edging will need to be placed around the perimeter of the brickwork and set to just below the height of the finished brick surface. For this application you can cement the pavers down or you can use a liquid nail that is made for concrete. Pavers can then be placed in a wide variety of patterns on top of the sand.
Installing the 1" Brick Pavers
Start at a corner - if possible, one that includes an edge such as a house, curb, sidewalk or other fixed edge. Lay one run of bricks from the corner along the two adjacent borders. Set the brick on the sand. Dont press or hammer them into place. They should fit snugly, with about 1/16" - 1/8" gap between each brick. As you work, be sure to work from the laid brick, not the sand. If you disturb the leveled sand, re-level it with a broom or trowel before laying more brick.
Continue to lay the brick in your pattern, working from your starting corner to the unanchored edge. With the original perimeter brick as a reference, put a string line across the front of your laying edge (every 2 to 3 feet) to maintain alignment. If the pattern wanders somewhat, a trowel, screwdriver, or wide-blade putty knife can be used to make small adjustments. Dont be concerned with small gaps between the paving brick you will fill them with sand.
Be sure to check the level and alignment of the brickwork frequently during installation. It may be helpful to use a chalk line during installation.
Once all the full bricks have been installed up to the final, unanchored edge, cut or saw the remaining brick to complete the pattern. Since it may be necessary to cut some of the bricks near the edging areas with a curved surface you can use a thin PVC pipe that is very flexible to outline the area. Mark a few points along the curve you want to cut, and then connect the dots by laying the PVC along that curve. For all cut lines you mark remember to leave room for your soldier course.
Anchor the final border. Once the bricks are all in place, spread the concrete sand between the bricks and over the surface. Sweep away excess surface sand and the job is done. Over the next few weeks you may find it necessary to sweep more sand between the joints after a hard rain or after the area has been used. This is because the sand will eventually sink into the joints.
|
|
|
|
|