Tools Needed
- Flat Shovel
- Wheelbarrow
- String Line
- Wooden Stakes
- Spray Paint
- Garden Hose with Fine Spray Nozzle
- Push Broom
- Plate Compactor (rental) or Base Tamper
- Base Rake (or Hard Garden Rake)
- Masonry Saw (rental)
- Level at least 4 feet long
- Wood screed strip a 2" x 4" at least 4 feet long
- Trowel
- 2 Lengths of 1" Conduit Tubing
Materials Needed
- Brick Pavers
- Aggregate Base Material - 919 Screenings
- Mason Sand
- Concrete (or other edge restraint)
Planning the Area
Proper planning will ensure that your brick paver installation project is a success.
When taking measurements, always round up as it is better to overestimate the amount of brick pavers needed than to find yourself near the end of a project and not having enough materials.
Calculating Waste
A 5% waste factor will suffice for most brick paver installations but if your project has more curves you may want to factor up to a 10% waste percentage.
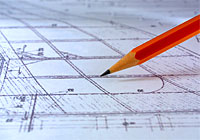
Project Design and Layout
Taking the time to produce a detailed design, whether with pencil and paper or digitally, will assist in foreseeing potential problems as well as aiding in correctly calculating the materials needed.
Graph paper is a great choice for producing drawings. Always draw out your project to scale using 1/4 scale for smaller projects and 1/8 scale for larger ones.
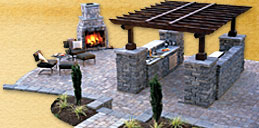
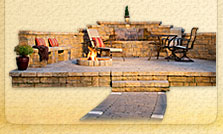
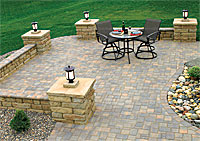 Patio Considerations
If you are installing a brick paver patio then you may want to consider how much space you will need for entertaining guests, outdoor cooking, patio furniture, etc.
Also consider the orientation of the patio in regards to how much sunlight the patio will receive during the hottest part of the day.
Patios facing towards the South will receive direct sunlight and may benefit from the addition of a pergola or some strategically placed shade trees.
Also determine where the entry and exit points for the patio will be and plan out enough space to avoid obstacles.
A knee high wall around the perimeter of the patio will not only further define the patio area but will also provide additional seating and surface area.
Utility Service Locate
Make sure to contact your local utility companies to locate any underground wires or cables at least 48 hours before digging or excavating. This is usually a free service provided to homeowners and contractors. You can dial 811 from anywhere in the United States to order a locate.
Excavation
 Excavation & Aggregate Base Depth
Driveways - Minimum of 6 inches
Patios & Walkways - Minimum of 4 inches
* Measurements provided above are considered a minimum for Florida residents. If you live in an area with soft soil then a deeper base is recommended.
Most brick pavers are 2 3/8" thick. Add this measurement to your base depth to calculate how deep you should excavate. For example, for a driveway you should excavate a total of 8 3/8" from where you expect the surface of the pavers to be when the job is complete (assuming that you are using a 6" base depth and using 2 3/8" thick brick pavers).
Using spray paint, mark out the area that you plan to excavate making to to extend outwards approximately 6 inches farther than where you plan for the bricks to end. This will provide a firm foundation for the paver to rest on and allow extra room for any necessary adjustments.
For marking circles, place a stake in the centerpoint of the circle and tie a string to the can of spray paint a few inches longer than the radius of the circle. While keeping the string taught, mark the circumference of the circle to be excavated.
It is important to provide a pitch or slope away from the house or structure to allow the water to properly drain. If using a 4 foot level then approximately a quarter of a bubble should provide adquate pitch, otherwise plan for a 1/8"-1/4" slope per foot.
Place wooden stakes around the perimeter of the area to be excavated and tie a string at the point where the final surface of the pavers should be. Make sure that the string follows the pitch or slope.
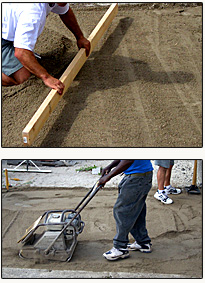
Now you are ready to begin excavating. Once the area has been excavated and leveled it is important to compact this subsoil prior to the addition of any base aggregate.
Base Material
Once the excavation has been completed, the next step is laying the base material. The most common base material used in florida underneath concrete brick pavers is 919 screenings.
It is suggested that you compact the base material every 2 for best results. Once the base aggregate is spread evenly, using the compactor, go over the area several times in a circular motion. For small areas and corners, use a hand tamper to compact the soil.
Lightly misting the aggregate with water will aid in the compaction process helping to create a firmer base.
Bedding Sand & Screeding
Once the base aggregate has been laid and thoroughly compacted, it is time to apply a layer of fine bedding sand.
This layer provides the pavers a nice base for easier compaction and a sturdy surface.
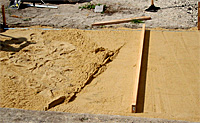
Spread a 0.5" to 1" layer of fine sand (such as mason sand) and spread evenly.
Use the 2 lengths of 1" diameter conduit tubing as screeding guides running parallel to each other. Screeding is the process of leveling the bedding sand by dragging a wooded board, such as a 2"x4", across the screed guides creating a level surface by eliminating any high spots and helping to distribute the sand evenly.
The screeding process is complete when a brick paver is laid on the surface and sits approximately 1/4" above the string line. Once the compactor is ran over the pavers, the brick pavers should settle and sit level with the string line.
The most important part of any brick paver installation is the compacting and preparation of the base aggregate and bedding sand. Any mistakes made here could result in issues later on down the road such as uneven pavers or dips in the paver surface or possibly even a compromise in the structural integrity of the project.
Once the bedding sand has been screeded, do not walk on it or disturb it in any way.
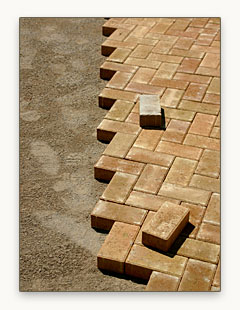
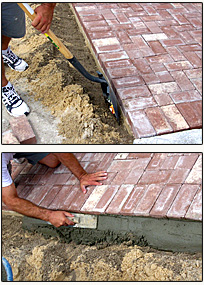
Laying the Brick Pavers
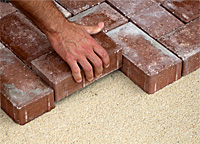
You may find it helpful to pop some chalk lines to use as guides and ensure that the pavers are square in relation to the house..
When laying the pavers stand on the pavers that have already been installed and work your way out. Do not stand on the leveled base material while installing the pavers. This will disrupt the levels you have just perfected.
A common technique used by hardscapers to lay brick pavers called the "click-click-drop" method. Quite simply what this means is, as you are laying a paver into your pattern, holding the paver an inch or so above the base, you bring the paver so that one side contacts the side of a paver you have already laid. "Click." Then you slide the paver along until a second side makes contact with another paver adjacent to the first. "Click." With these two pavers now serving as a guide, you lower the paver onto the base. "Drop."
The reason for this method is to prevent any sand or base materials from getting inbetween the paver joints preventing the brick pavers from making full contact with each other.
Cutting Brick Pavers
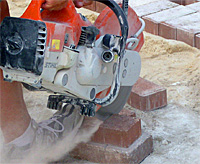
For rounded edges, you can use a flexible piece of small diameter pvc or a garden hose as a guide to mark the pavers where they need to be cut. Make sure to account for the soldier row or border when determining where to make your cuts.
After determining the pavers that need to be cut, you can draw a line on them or use a chalk line to see where each paver needs to be cut. Please use caution when cutting the concrete pavers.
Concrete Edge Restraint Installation
Using concrete is a very popular and cost effective choice for an edge restraint. Other choices exist such as plastic or aluminum edge restraints that use spikes to hold them in place.
Using a flat shovel, dig straight down the edge of the brick pavers a minimum of 6 inches deep. Continue to dig a trench pulling the soil away from the edge of the pavers while being cautious not to disturb the base aggregate, bedding sand, or the pavers.
Using a trowel, apply the concrete into the trench being sure to press it in place to avoid any air getting trapped and to ensure that the concrete is pressed firmly against the pavers and base materials. Do not come more than halfway up the paver with the concrete.
Slope the concrete downard away from the pavers so that grass or sod grass will be able to grow up to the edge of your paver project. This will also help keep the pavers stabilized.
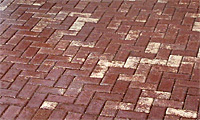
Sanding the Joints
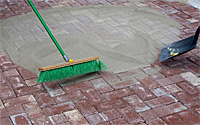
Use mason sand or concrete sand for sanding the joints between the brick pavers. Make sure that the sand is dry otherwise it will be difficult to get the sand to settle between the joints properly.
If using polymeric sand, be sure to closely follow the instructions on the bag. Failure to do so may damage the surface of your brick pavers.
Pour or shovel the sand onto the brick pavers and sweep into the joints using a push broom. Run the compactor over the surface of the pavers. Sweep more sand into the joints and repeat running the compactor over the pavers.
If using polymeric sand, use a leaf blower to blow off any excess polymeric sand from the surface of the pavers. Failure to ensure that the surface of the pavers is free from polymeric sand may cause damage to the pavers.
Apply a fine mist of water to the polymeric sand to activate the binder. Follow the instructions on the bag and repeat if necessary. Do not apply polymeric sand if rain is in the forecast!
Compacting the Brick Pavers
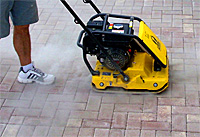
After the installation is complete, including the edge restrains, run the plate compactor over the pavers.
Compacting the pavers helps settle the pavers into the bedding sand and creates a flat surface. It is recommended to use a minimum of three passes with the plate compactor going in different directions.
Applying the Finishing Touches
Now that your paver project is complete you may use it immediately. For driveways it is recommended that you wait at least 24 hours to drive on the driveway if concrete edge restraints were used.
You may want to mist the top of the pavers to wash the extra sand into the joints of the pavers.
|